This is the next installment in our series on Hacking Team’s ‘Galileo’ Remote Control System (RCS). After defeating the license restrictions, we’re able to install the full backend system, and operate it as if we were a HackingTeam customer. (See my post Here for details).
As covered previously on this blog, there are a number of elements to a deployment of the ‘Galileo RCS’.
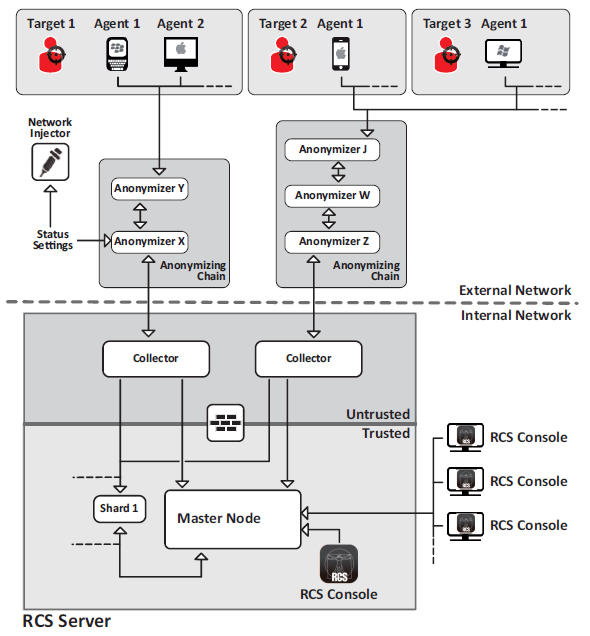 RCS Architecture from the leaked Sysadmin manual
The main element is the master node, which stores evidence in a MongoDB instance, and handles agent deployments and building. The ‘Collector’ node is the interface between the master node and the chain of ‘Anonymizers’ that lead to the agent itself. The anonymisers create a chain of connections, obfuscating the location and identity of the final Collector node.
The anonymiser essentially acts as an HTTP proxy, and runs on CentOS. We can therefore setup a virtual machine in our Galileo Lab and provision it as an Anonymiser.
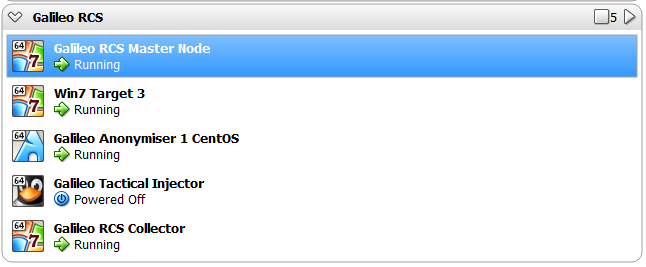 Galileo RCS Lab
To provision the Anonymiser, we create a new anonymiser on the console, then export the installer. This creates a zip file which we copy to the CentOS instance. After un-zipping it, we have an ‘install’ file, which we can run with:
sh install
We then need to either disable the default iptables firewall, or create an exception. As this is just in my lab, I ran:
service iptables stop
Once we’ve done this, we then go back to our console and drag the Anonymiser onto the Collector to create a chain. Clicking ‘Apply Configuration’ then pushes this to the collector and the anonymiser, setting up the chain.
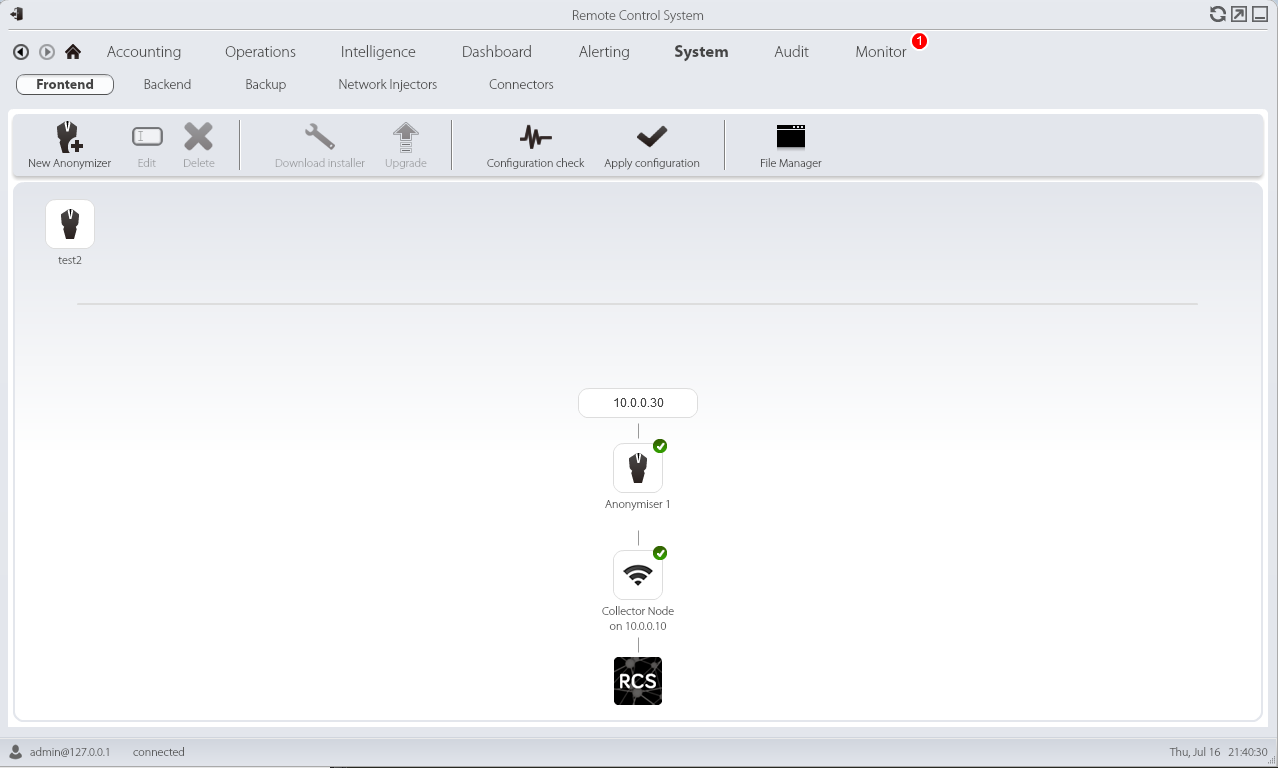 Completed anonymiser chain
So we now have our infrastructure setup, but we won’t be able to run the implants in their current form on virtual machines. As mentioned previously, all of the implants have an ‘AntiVM’ function which checks to see if the implant is virtualised, and exits if it is.
BOOL AntiVM()
{
	AntiCuckoo();
	BOOL bVMWare = AntiVMWare();
	BOOL bVBox = AntiVBox();

	if (bVMWare || bVBox)
		return TRUE;

	return FALSE;
}
When we were compiling from source, we could just comment out this check, but the leaked source code is only for version 9.2 of the software. We’d like to use version 9.6 to explore any new features added. Therefore we need to patch the windows agents in use.
The first stage is identifying where the base executables that the backend uses are located. When the system is installed, the ‘cores’ are extracted to ‘C:\RCS\DB\cores’. Each of these is a zip file containing the base images for all of the various agents.
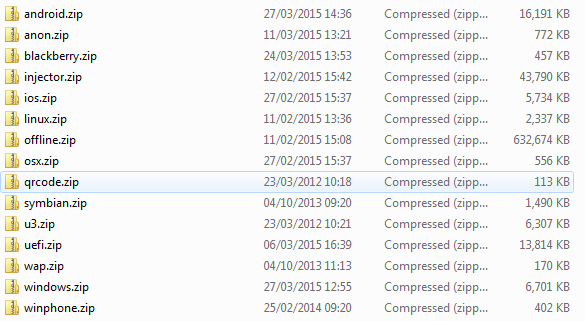 Compressed agent cores
When the master node starts it checks to see if there are any files in this directory, and loads them into the MongoDB database if so. Therefore if we want to update the windows core, we need to create a new ‘windows.zip’ containing our patched agents that will run inside VMs, and then load them into the master node.
The ‘windows.zip’ has the following contents:
Volume in drive G is VBOX_downloads_desktop
Volume Serial Number is 8A93-92DF

Directory of G:\Hacked Team\FAE DiskStation. DELIVERY.3. Software (releases)\RCS 9.6 (stable)\Product\Server\cores\windows

10/07/2015 13:02

.
10/07/2015 13:02..
11/01/2011 06:02 11,264 aplib.dll
08/04/2010 10:18 166,400 AsmJit.dll
27/11/2014 15:55 1,082 ca.cer
27/10/2011 16:15 208,896 codec
16/12/2013 13:03 346,624 cooker.exe
19/03/2015 17:20 669,184 core
16/01/2014 12:21 82,432 core64
16/12/2013 13:02 1,780,736 dropper.exe
23/03/2015 17:28icons
20/05/2013 17:49 93,696 packer32.exe
12/03/2013 05:07 114,688 packer64.exe
19/10/2012 10:59 17,920 rcedit.exe
27/03/2015 14:55 245,248 scout
27/03/2015 11:53 6,486 scout_names.rb
03/09/2014 15:03 167 scout_packer.rb
10/03/2015 15:12 4 scout_version
08/02/2010 12:30 314,368 SignTool.exe
15/11/2013 08:11 1,064,448 silent
19/03/2015 17:21 649,216 soldier
03/09/2014 15:03 138 soldier_packer.rb
05/08/2014 11:35 6,190 soldier_upgrade
12/03/2015 12:00 6 soldier_version
27/10/2011 16:15 258,048 sqlite
19/10/2012 10:59 110,592 verpatch.exe
18/02/2015 12:49 10 version
03/07/2014 23:22 526 VMProtect.key
04/07/2014 00:31 4,427,848 VMProtect_Con.exe
28/03/2014 12:55 412,160 VMProtect_Ext.dll
28/11/2014 16:11 333 vmprotect_project.vmp
16/12/2014 11:11 6,039 windows.pfx
29 File(s) 10,994,749 bytes
3 Dir(s) 54,780,149,760 bytes free
It looks like ‘scout’ and ‘soldier’ are the two base images that we want to patch.
We have the source code for the ‘AntiVM()’ function, but we need to find what it looks like in the compiled code. Starting with the scout agent, we can open it up in IDA (A reverse engineering tool) and find the code segments that correspond to the AntiVM code.
The ‘AntiVBox’ and ‘AntiVMware’ functions both use WMI queries in order to identify a virtual environment. These queries use the ‘CoCreateInstance’, ‘CoInitialise’ and ‘CoSetProxyBlanket’ functions from the Windows API.
	CoInitialize(NULL);
	if (CoCreateInstance(CLSID_WbemLocator, 0, CLSCTX_INPROC_SERVER, IID_IWbemLocator, (LPVOID *)&pLoc) != S_OK)
		return TRUE; //if the call fails, we suppose the scout is running in a sandbox (ex: comodo)
	if (!pLoc)
		return TRUE; //if the call fails, we suppose the scout is running in a sandbox (ex: comodo)

	WCHAR strRootCIM[] = { L'R', L'O', L'O', L'T', L'\', L'C', L'I', L'M', L'V', L'2', L'' };
	BSTR bRootCIM = SysAllocString(strRootCIM);

	if (pLoc->ConnectServer(bRootCIM, NULL, NULL, 0, NULL, 0, 0, &pSvc) == WBEM_S_NO_ERROR)
	{
		if (CoSetProxyBlanket(pSvc, RPC_C_AUTHN_WINNT, RPC_C_AUTHZ_NONE, NULL, RPC_C_AUTHN_LEVEL_CALL, RPC_C_IMP_LEVEL_IMPERSONATE, NULL, EOAC_NONE) == S_OK)
		{
			VARIANT vArg;
			VariantInit(&vArg);

			WCHAR strQuery[] = {L'S', L'E', L'L', L'E', L'C', L'T', L' ', L'*', L' ', L'F', L'R', L'O', L'M', L' ', L'W', L'i', L'n', L'3', L'2', L'_', L'B', L'i', L'o', L's', L'' };
			WCHAR strSerial[] = { L'S', L'e', L'r', L'i', L'a', L'l', L'N', L'u', L'm', L'b', L'e', L'r', L'' };
			if (ExecQueryGetProp(pSvc, strQuery, strSerial, &vArg) && vArg.vt == VT_BSTR)
			{
In addition, we have these string arrays containing the actual queries to be run; The ‘AntiVMWare’ query is: ‘SELECT * FROM Win32_Bios’, and the ‘AntiVBox’ query is: ‘SELECT * FROM Win32_PnPEntity’. These aren’t stored as strings though, but as character arrays, which makes it slightly harder to locate them in IDA.
However, we can still narrow it down, and eventually find the code segments that load and execute these queries
 Anti VirtualBox WMI Query
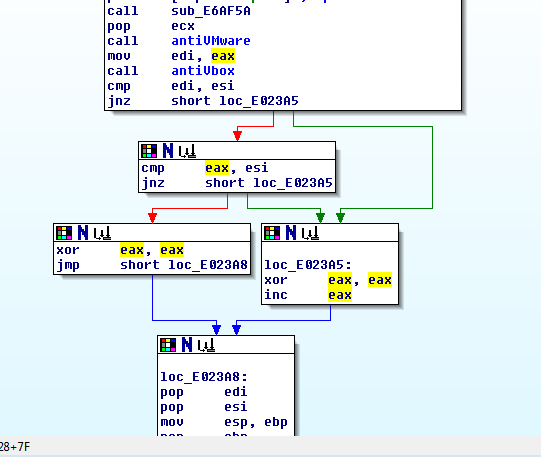
Tracing backwards, this allows us to identify the whole ‘AntiVM’ function:
 ‘AntiVM()’ function
So if virtualisation is detected, then the value of EAX is set to 1, otherwise it’s set to zero (XOR-ing anything with itself results in zero).

It’s now fairly trivial to locate the specific assembly instruction ‘mov eax, 1’ and patch it instead to be ‘mov eax, 0’, so that the function always returns zero.
 Patched AntiVM function in Immunity Debugger
So we’ve now patched the scout implant (finally…), but what about the next level up?
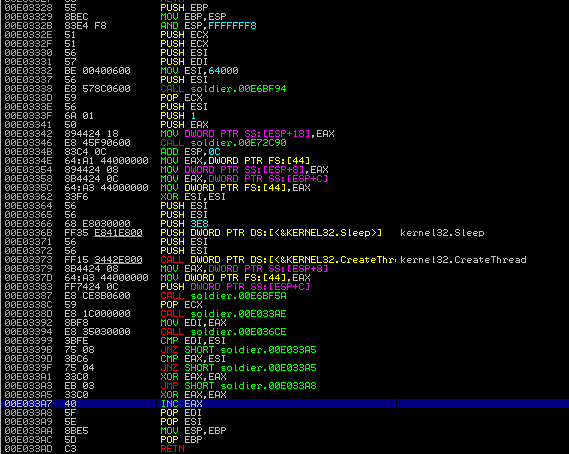
The ‘Soldier’ agent actually shares the same code as the scout to detect virtual environments. The compiled code is slightly different however, probably due to a compiler optimisation.
 ‘Soldier’ Implant AntiVM function
.
Whereas the scout sets EAX to 1 using ‘mov eax, 1’, the soldier instead sets EAX to zero, then increments it by one (‘INC EAX’). Regardless, we can still patch the function to always return zero by replacing the ‘INC EAX’ with a ‘NOP’ (No-operation) instruction. This does nothing, and leaves EAX set to zero.
 ‘INC EAX’ instruction to be patched to NOPs in Soldier implant AntiVM() function
.
Now we need to load these updated agents into the database. We copy our updated ‘scout’ and ‘soldier’ files into ‘windows.zip’, then copy that into ‘C:\RCS\DB\cores’. Lo and behold, the next time the database starts our updated core is loaded:
2015-07-20 12:26:49 +0100 [INFO]: Loading cores into db…
2015-07-20 12:26:49 +0100 [INFO]: Loading core: windows…
2015-07-20 12:26:49 +0100 [INFO]: Load core: ‘windows’ | version 2015032101 | sha1 1daaeece8c9a7c624b9f26147562b052fb691e44
So after all of that work, we should be able to run an agent on a virtual machine to try out its features. We first create an ‘Operation’ that will contain all of our targets.
 Operations Page
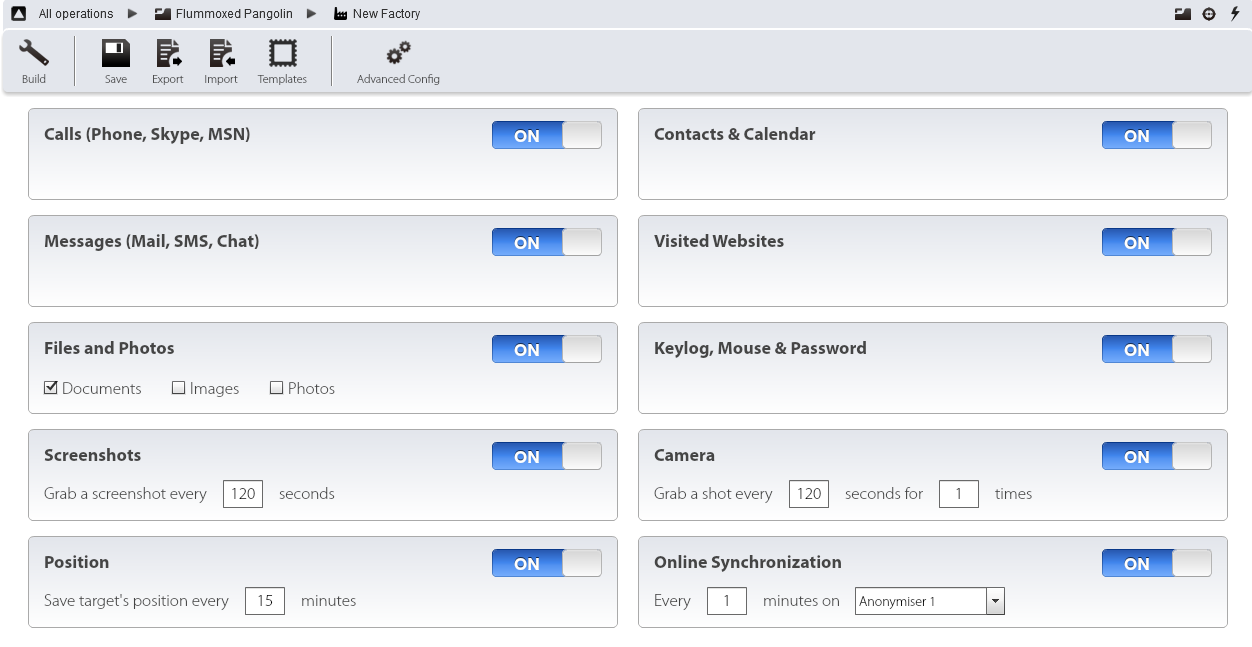
We then create a ‘Factory’ to build our agents. This allows us to configure what features we want enabled, as well as the frequency of call-backs.
 Configuration options within an agent factory
Once we’ve decided on our configuration, we then click ‘Build’ and are presented by this mildly amusing pop-up:
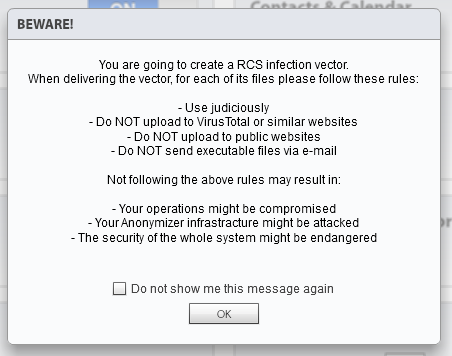 I think they might have bigger problems now…
Clicking on, we get to choose what the infection vector will be (i.e. how the agent will be executed). Each of these vectors is a post on its own, so for the moment we’re just going to generate an executable to be run by the victim (i.e. Us).
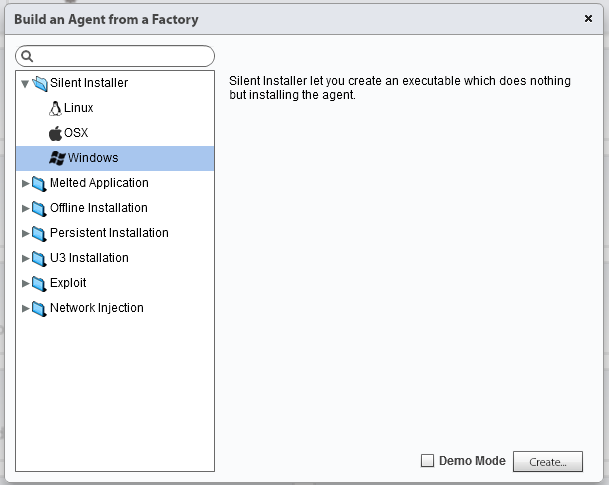 Selection of infection vector
Clicking ‘create’ gives us an executable on our local machine under ‘RCS Downloads’.

We can then copy this to our target machine and run it, installing the implant. As mentioned previously, the ‘scout’ implant (which this agent is) sends back device information and screenshots so that the operator can determine if the target is valid or not. When the implant calls home, a new ’target’ is created in the operation, allowing viewing of evidence obtained from that agent. After we’ve decided that the target is valid, we can upgrade the agent to allow collection of much more data.
All of the evidence is displayed in an easy-to-view format. Some examples of evidence are shown below, including keystroke logs and device information.
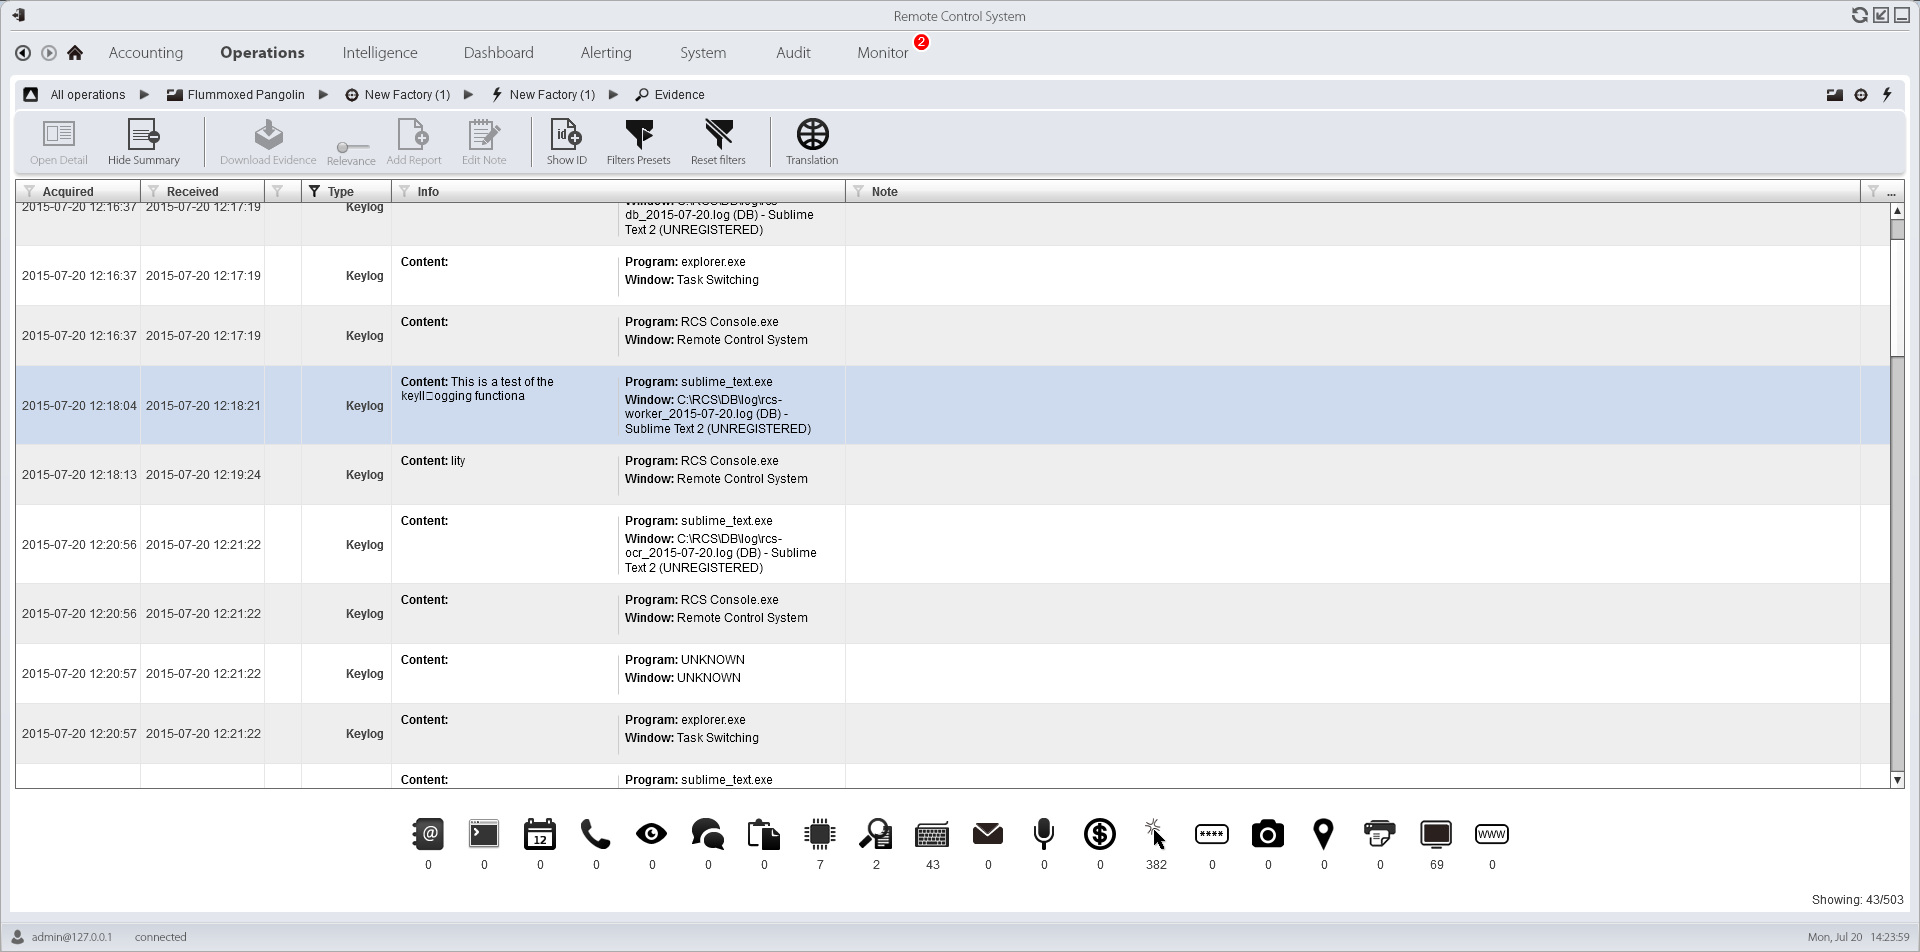 Keystroke logging
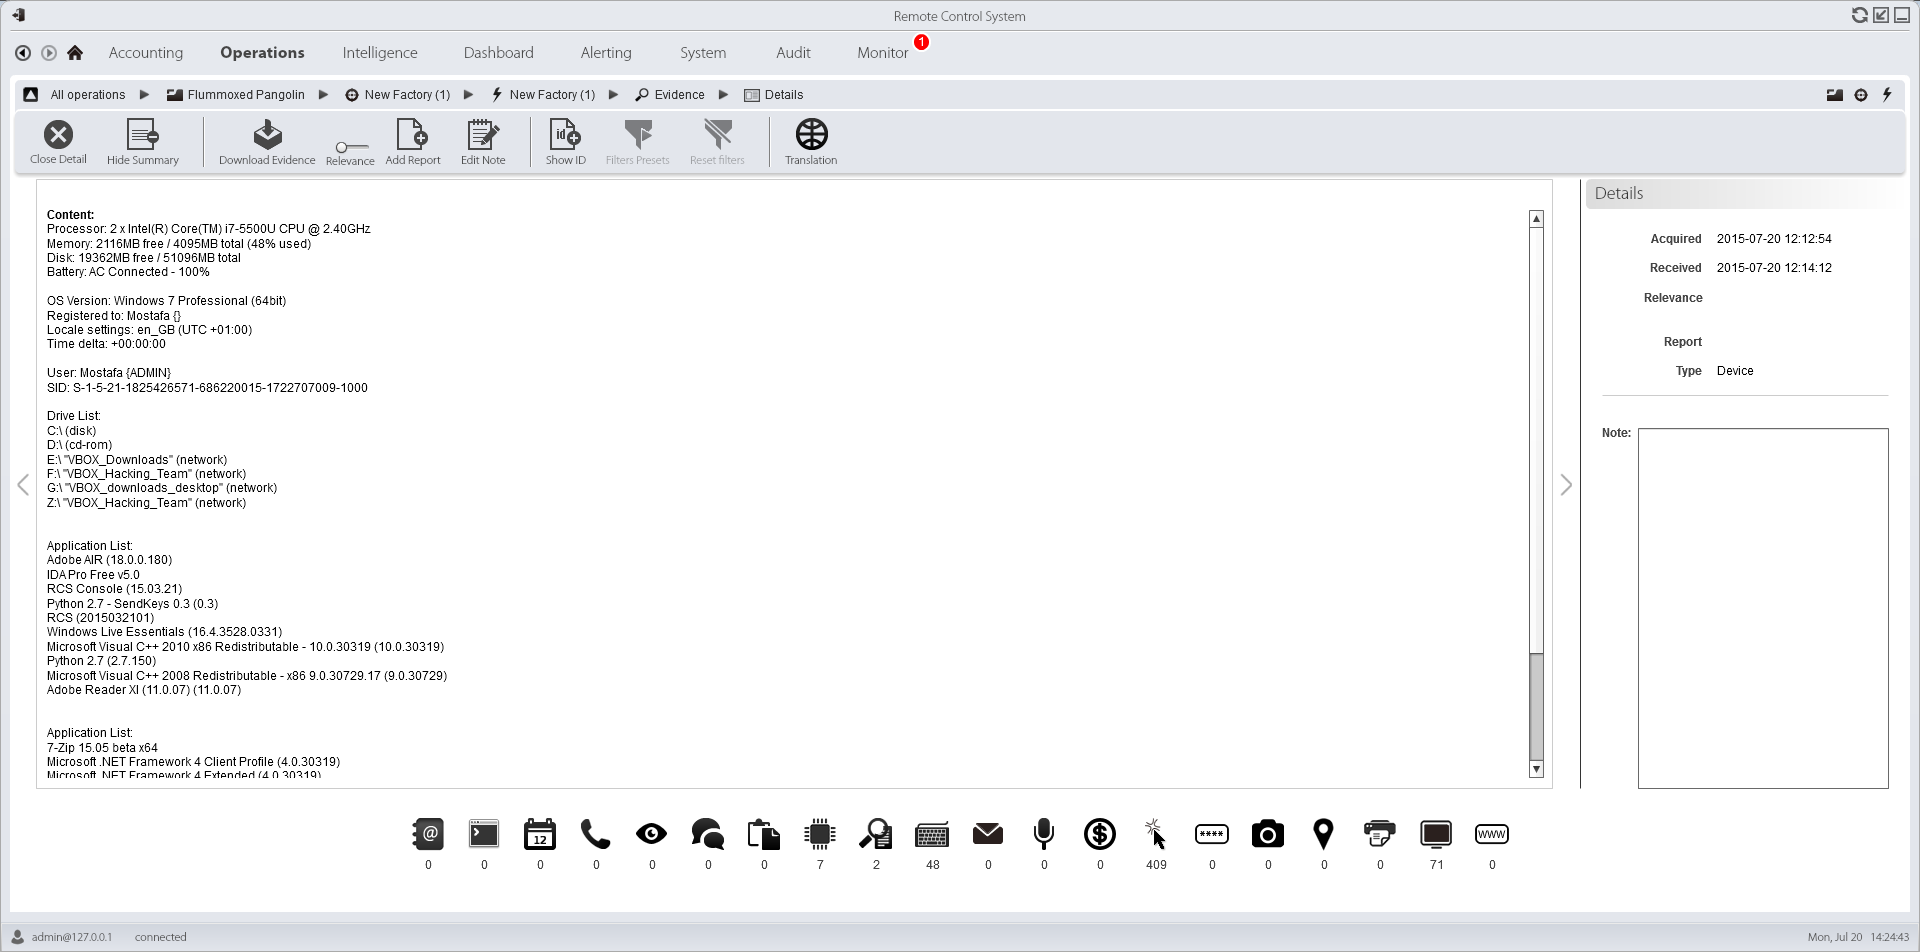 Gathered Device Information
Another interesting feature is Optical Character Recognition (OCR). This aims to recognise text in images and convert it into actual text. This feature allows recognition of text in screenshots. This is also coupled with a translation feature, allowing the translation of text in screenshots.
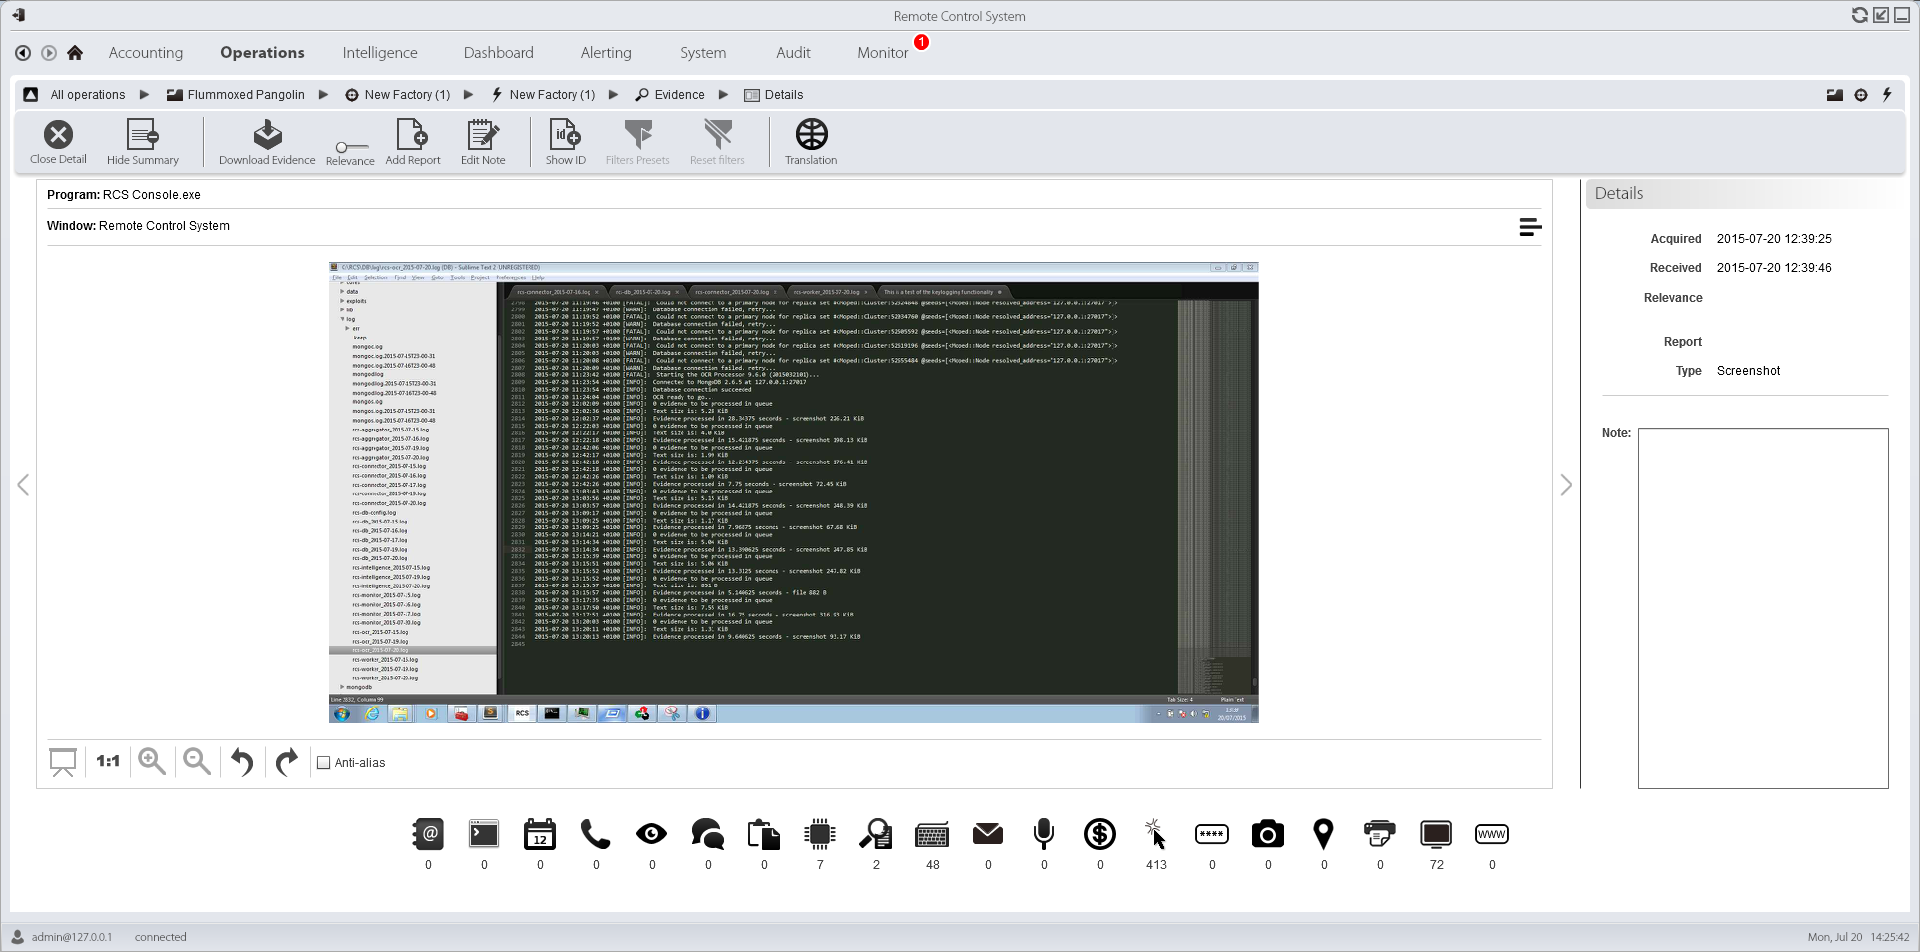 Captured Screenshot
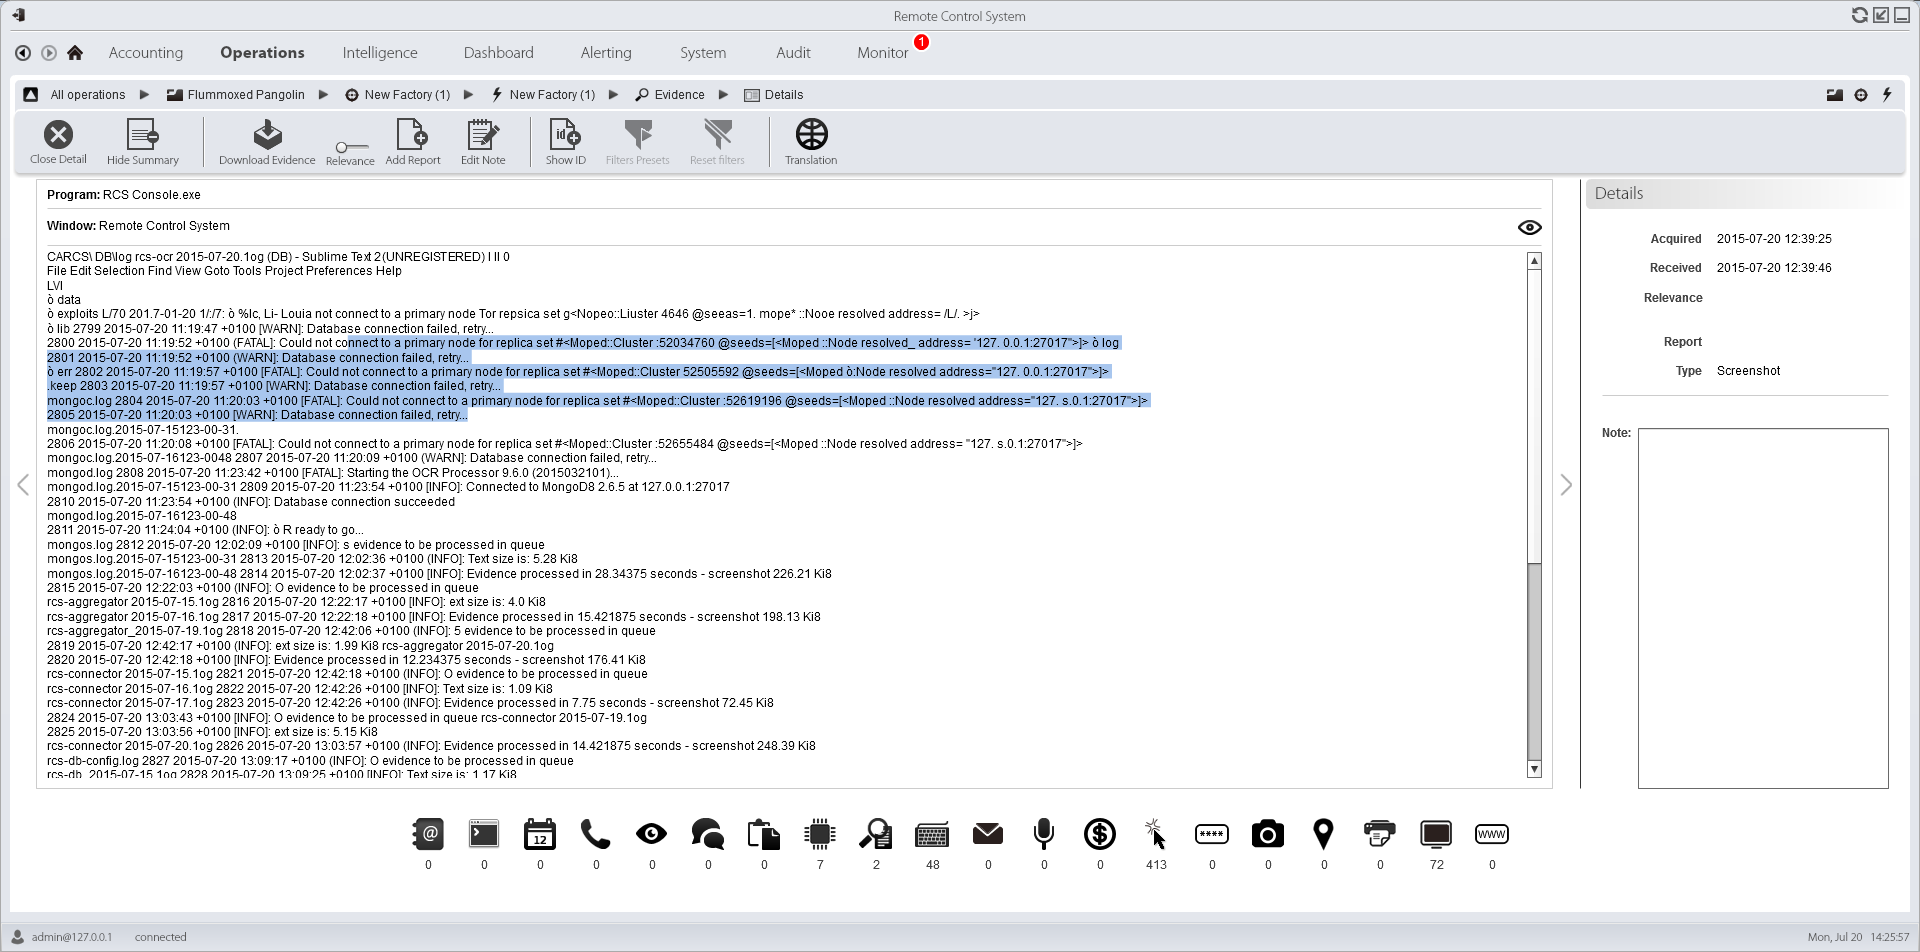 OCR of previous screenshot
So to wrap up, we’ve managed to deploy an operational infrastructure, patch the implants so they’ll run in our virtual lab and finally run a mock operation on our ’targets’ and gathered intelligence. Using all of this information, we can start to put together a picture of what an attack using this toolset would look like, and how we could defend against it.
In future, we’re going to look in more depth at the persistence mechanisms available in the platform, as well as what ‘backdoors’ Hacking Team may have included to monitor their client’s activities.
